Introduction
Recently, for a project I’ve been working on, a requirement has arisen to deploy a small Linux server to run a GUI application 24x7. It wasn’t practical to just export the display, because the application needed to run independently of external resources; therefore, I needed to deploy a full (but lightweight) X11 environment, with a reliable and secure VNC server for remote operation of the application.
While there are many VPS options out there, at the same time I was studying some cloud technologies, and came accross a Google Cloud Platform banner giving free credits to try the platform. “Why not learn a little bit of GCP and deploy my server for free?”, I thought… And it was the perfect match.
In this article, I’ll show you how to:
- Create a basic Linux VM instance on GCP’s Compute Engine.
- Configure GCP’s firewall to allow external VNC traffic to the instance (I’ll configure the VNC server with built-in encryption, so we don’t need to tunnel it through an SSH connection).
- Install, configure and secure a VNC server with a full, lightweight X11 environment appropriate to run Linux GUI applications.
Creating a Linux VM on GCP’s Compute Engine
In this article, I won’t explore GCP’s Compute Engine in depth, as it’s not the main subject. I’m also assuming you already have a GCP account and created a project where you can start deploying resources, such as VM instances.
Once you have that ready, the first step is to navigate to the “VM instances” page of the Google Cloud Platform:

- Name: the name of your instance (it will also be auto-assigned as hostname on the operating system).
- Zone: since we want the lowest possible latency to operate a remote GUI application, choose a location that’s closest to you.
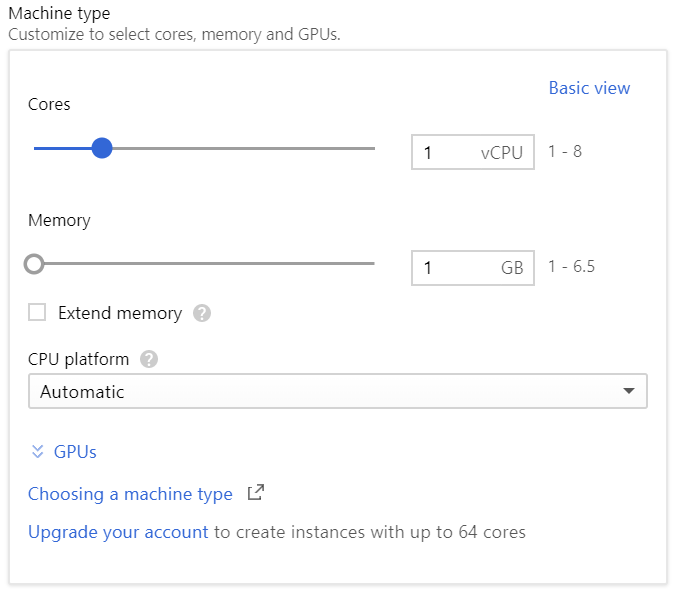
- Machine type: depends on your needs. You can choose from a set of pre-configured machine types, or customize it. For my case, 1 vCPU and 1 GB of RAM was enough (custom setting):

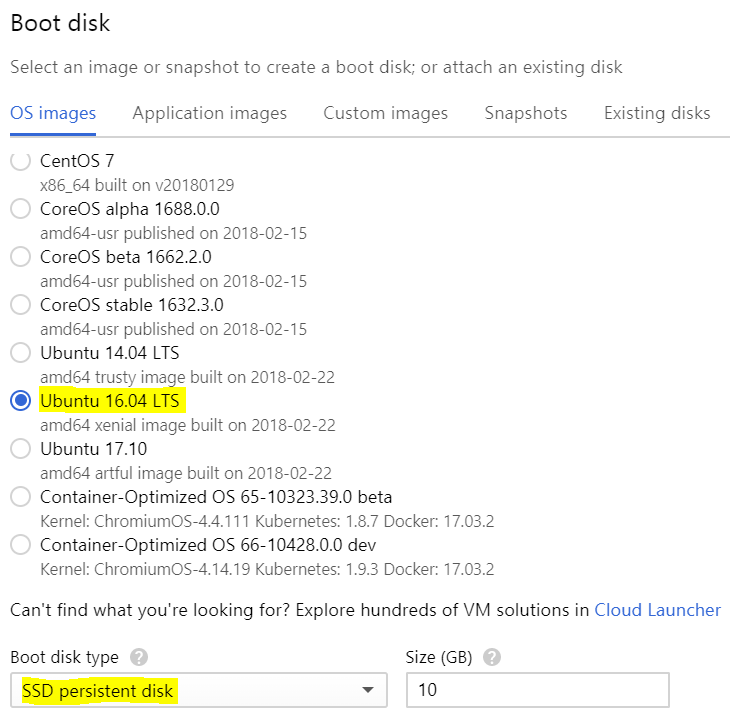
- Boot disk: Google provides a wide list of pre-built Linux images. I chose a Ubuntu 16.04 LTS image. For the “Boot disk type”, I chose an “SSD persistent disk” instead, since the price difference is very small, but the performance benefit is noticeable.

- Identity and API access: leave as default.
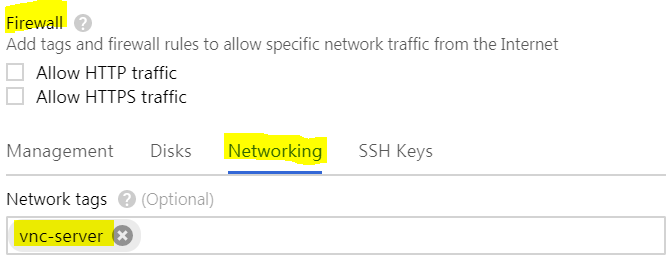
- Firewall: SSH access is open by default. We also need to at least open the firewall for VNC traffic, since we’ll configure it with built-in encryption, so we don’t need to tunnel it through SSH (faster). This is done through network tags here; later, we’ll create a firewall rule and associate it with this tag.

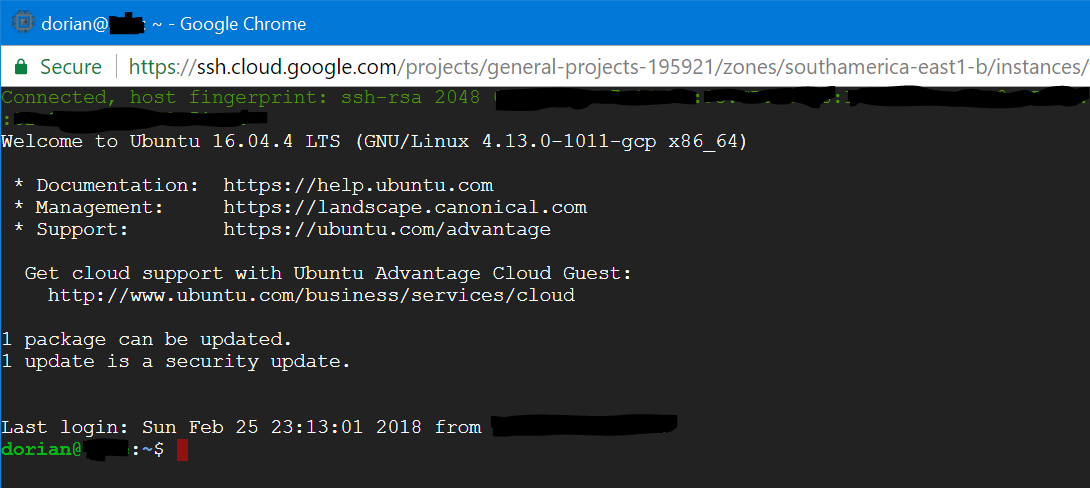
- Create: click this option and your VM instance will be created. Once this is done, you’ll see it listed on the initial page. Click on “SSH” to open a new SSH connection; this is an important step, because at this point GCP will transfer your project’s SSH keys to the instance, leaving it ready for external connections (using the “External IP” address).


- Test external SSH connections: at this point, you should test external SSH connections using your favorite SSH client. If you want to use key-based authentication, use the public key from your GCP project. If you want to use passwords, assign your username a new password, and configure the SSH daemon to accept plain-text passwords. I’ll leave that to you, but make sure it works before continuing. ;)
Opening GCP’s firewall for VNC traffic
As explained before, I won’t tunnel the VNC traffic through an SSH connection: I’ll rather access it directly, but of course making sure the VNC server only accepts encrypted connections (more on that later). This setup is a little more complicated, but has the advantage of lower latency, and doesn’t require the creation of an SSH tunnel to access the GUI. It also teaches us a bit about the Google Cloud Platform’s firewall.
The first step we’ve already done: assigned the vnc-server network tag to the new instance. Now, head to the “VPC network / Firewall rules” page on Google Cloud Platform, and click on “Create firewall rule”:

Fill in these fields:
- Name: default-allow-vnc
- Description: Rule to allow ingress VNC traffic.
- Network: default
- Priority: 1000
- Direction of traffic: Ingress
- Action on match: Allow
- Targets: Specified target tags
- Target tags: vnc-server (ah, there you go!)
- Source filter: IP ranges
- Source IP ranges: 0.0.0.0/0
- Protocol and ports: Specified protocols and ports; tcp:5900-5905 (this allows a few more VNC displays, in case we need them)
Click on “Create”, and that should be it. Now we just need to confirm the port is open. Open an SSH connection to the VM instance, and install the “netcat-openbsd” package:
| |
Now let’s open TCP port 5901, and test if we can access it remotely:
| |
If you got similar results, congratulations! Now you are ready to proceed to the VNC and X11 environment setup.
VNC server and X11 environment setup
There are several software choices for the VNC server and X11 environment. Personally, for the VNC server, I chose TigerVNC, for several reasons:
- Open-source, and actively being developed.
- Support all the necessary X11 extensions.
- Is a high performer.
- Has built-in TLS encryption.
- Has servers and clients for several platforms.
I compared TigerVNC with others, such as TightVNC, and it is simply a no contest. For the X11 environment, I chose XFCE, because it’s both lightweight and feature-packed, but you are free to choose whatever you like. Just try to stick with lightweight options, such as LXDE, MATE etc. You also don’t need to install the full set of utilities that usually come with the desktop environment, just the essentials.
Time for hands-on:
| |
Notice how I installed the xfce4 metapackage instead of the xubuntu-desktop metapackage, which would install several (useless, in this case) utilities as dependencies. I also installed some fonts, the Firefox web browser, and the XFCE terminal (personal choices).
For the VNC server, unfortunately TigerVNC is not on the standard Ubuntu repositories, neither does it provide a PPA. However, it provides a DEB file. We just need to download and install it manually:
| |
Now it’s time to configure the VNC server. Start by creating a password for your server (tip: TigerVNC accepts long passwords, as opposed to other servers).
| |
Create the file ~/.vnc/config with the following content (geometry and color depth are personal choices):
| |
Create the file ~/.vnc/xstartup with executable permissions (e.g. 755), and with the following content:
| |
Time to test! Start a new VNC server instance:
| |
It should create a new X11 session on display :1, served by TigerVNC. You can check the running processes: there should be several XFCE-related ones, besides the Xvnc itself.
Now try to connect to the server, using a decent VNC viewer with TLS encryption support (tip: of course, the TigerVNC client is perfect ;) ). If it connects, congratulations! It’s almost done. At this point I usually customize the desktop to my liking, also trying to make it lighter, disabling unneeded services etc. If it doesn’t connect, or if it connects but you see a black window, start by checking the firewall and your XFCE installation, and make sure there were no typos on the config files.
You can now close the viewer and kill the server, because we’ll configure it to auto-start with the VM instance itself:
| |
To make it auto-start with the VM instance, we need to create and enable a SystemD service unit. Create the file /etc/systemd/system/[email protected] with the following content:
| |
Change the highlighted username according to your case. Now let’s enable and start the service:
| |
The VNC server should have started, together with the XFCE desktop environment, just like we did manually before. Test if it accepts remote connections from your viewer. If it does, reboot the server and test again, just to make sure the SystemD unit is properly configured and enabled. That’s it!
Conclusions
I hope you enjoyed this article, and that it helps also with similar scenarios, since many of the things I taught here can be adapted to other use cases. The Linux server setup itself is very basic, as the focus was only the setup of the VNC server and X11 environment.
An important thing you have to keep in mind is that your VNC server is now open to the Internet, subject to all sort of attacks, including brute-force ones. In a later article, I’ll approach some good security practices that should cover this situation. Stay tuned!
