Introduction
You must have heard that “IPv6 is the future of the Internet”, because there are (almost) no more IPv4 addresses available. That is certainly one of the main reasons (if not the main reason) for IPv6 adoption, but this new (well, not so new, since the first draft came to life in 1998) version of the IP protocol brings much more to the table.
It has been created from ground up as a technology to address the current limitations of IPv4 (not only the address space), but also as a future-proof technology, able to handle the most demanding network scenarios for decades to come. IPv4 was formerly defined in 1981, a time when technology and its foreseeable future was very different from what it is today (and where we now expect it to go).
Given that my ISP, for quite some time now, is providing to every customer a fully-functional dual-stack (IPv4 + IPv6) network, I decided it was time to tame IPv6. I have a recent version of DD-WRT installed on my home router, which besides having full IPv6 support, has extensive customization support, allowing me to setup both the WAN side and the LAN side with a working IPv4 + IPv6 dual-stack. And, since it’s Linux, after all, I had plenty of documentation available to help me through this journey.
Note, however, that I will not explain in greater detail all the IPv6 features mentioned here, for two reasons: one is that I still have lots to learn to consider myself an IPv6 specialist, and the other is that it’s not the scope of this article – there are entire books about IPv6 itself.
Some basic IPv6 concepts
Address Space
First, the obvious: while IPv4 has a 32 bits address space, meaning theoretically 232 possible IP addresses on the Internet (less, in practice, if you discount private and reserved address ranges, and network + broadcast addresses for each subnet), IPv6 has a 128 bits address space. That is a number so big that is has to be written in scientific notation: approximately 3.4 x 1038 addresses. Considering that it’s very possible that every little equipment will be connected to the Internet in the near future, and more and more people will have access to a multitude of such equipments each, it was wise to choose 128 bits.
One immediate consequence is that, while in IPv4 you had short, somewhat easy to remember addresses like 187.80.123.100 (4 x 8 bits blocks = 32 bits), in IPv6 you have things like 2003:11c7:0033:0000:11ab:0000:a5bd:1c98. So, the usage of a DNS server is almost a must. Note also that given the enormous address space, they are not commonly written as 4 blocks of 8 bits, in base 10, anymore: in IPv6, the IP addresses are usually written as 8 blocks of 16 bits (= 128 bits), in base 16 (hexadecimal). To make it easier (no joke intended), zeros on the left can be omitted (and even suppressed if the block is all zeros). So, taking the previous example, it can be written as:
2003:11c7:33::11ab::a5bd:1c98
Now can you memorize that! :)
The concept of subnets is basically the same as IPv4. It’s worth mentioning that, given the abundance of addresses, you are usually (and should be, as per the RFC) given a full 64 bits subnet from your ISP! Can you fill it with your devices at home? :)
Another important thing to mention is that the MAC address of the network element is now, by default, used to form the host identifier portion of the address (the final 64 bits), through a modified EUI-64 format; there are benefits and drawbacks of that approach, one of such being privacy concerns (although there are the IPv6 Privacy Extensions to work around it).
NAT
There is no NAT in IPv6. Well, there is, but it’s not necessary anymore, at least not for the reasons we are used to. With IPv4, NAT came to existence mainly to solve the lack of Internet-routable addresses available: you are usually given just one IPv4 address from your ISP, so the usual setup is to give your home devices private IPv4 addresses and setup a NAT on your router, so these devices can communicate with the Internet. Now, with IPv6, each device can easily have an Internet-routable IPv6 address (remember, you are usually given a full 64 bits subnet!), meaning your router doesn’t need to translate addresses anymore, just route them.
Autoconfiguration and Addressing
IPv6 introduces the concept of SLAAC: Stateless Address Autoconfiguration. Through a revamped use of the ICMP protocol (now called ICMPv6), and the introduction of the Neighbor Discovery Protocol (NDP), hosts can automatically configure their IPv6 network as soon as they are plugged in.
SLAAC, however, initially didn’t contemplate things such as informing the DNS servers. Therefore, DHCPv6 was developed; the concepts are very similar to DHCPv4, and it can be used together with SLAAC, to provide only this additional information, or replace it entirely, as it is usually used in IPv4.
Later, alternatives to avoid having to deploy a DHCPv6 server (for most cases, like DNS information) have been developed, such as RDNSS and DNSSL, keeping everything in the ICMPv6 and NDP world, as originally intended.
It’s also worth mentioning that all IPv6-capable nodes will automatically configure at least one Link-Local (LL) address, which is valid only on a single link (they are not routable), roughly equivalent to the IPv4 addresses 169.254.0.0/16. These addresses start with FE80::/64, with the last 64 bits having the network interface’s MAC address encoded, as mentioned before.
There are also Unique Local Addresses (ULA) in IPv6, roughly equivalent to the IPv4 addresses 10.0.0.0/8, 172.16.0.0/12 and 192.168.0.0/16, intended for local communication (routable only within a site or organization). These addresses start with FC00::/7, with 40 random bits used as a Global ID, to guarantee uniqueness, and can also be autoconfigured.
Prefix Delegation
One thing that definitely requires a DHCPv6 server, as so far there isn’t (AFAIK) a proposed alternative using ICMPv6 and NDP, is prefix delegation.
Remember I mentioned that most IPv6-enabled ISPs give a 64 bits subnet for each connected customer, which they can use on their LAN? Well, there must be a way for the ISP to inform the customer’s router which subnet they can use for that (and it can be dynamic, the same way you sometimes get a different IPv4 address when reconnecting to your ISP): say hello to DHCPv6 Prefix Delegation.
Your router, after connecting to your ISP’s IPv6 network and having already received the basic information it needs for the WAN side, probably through SLAAC, needs to know which subnet / prefix it can use for the LAN side (since it can be different from the one received for the WAN side). It gets this information from the ISP using DHCPv6, configures his own LAN interface in this subnet, and starts advertising it to LAN devices, by means of the traditional autoconfiguration protocols mentioned before (SLAAC or DHCPv6), similar to what happened on the WAN side before.
As a result, your LAN devices nicely autoconfigure themselves with an Internet-routable IPv6 address, formed by the subnet dynamically informed by the ISP as the first 64 bits, and their MAC addresses translated into the last 64 bits (if not using privacy extensions).
Multicast, Broadcast & Anycast
While IPv4 made extensive use of broadcast for many situations, IPv6 ditched it in favor of multicast: every IPv6 node is required to support it. This is a much more efficient and organized approach, limiting traffic only to the nodes that want to receive it, and defining which kind of traffic (scope) is allowed for each multicast group.
Multicast addresses, in IPv6, start with the FF byte – meaning that if you see an address starting with FF00::/8, you know it’s multicast. Several scopes have been standardized:
- FF02:: - Link local: spans the same topological region as the corresponding unicast scope, i.e. all nodes on the same LAN.
- FF05:: - Site local: is intended to span a single site.
- FF08:: - Organization scope: intended to span multiple sizes within the same organization.
- FF0E:: - Global scope, assigned by IANA.
- FF01:: - Interface local: spans only a single interface on a node and is useful only for loopback transmission of multicast.
Within each scope, there are some preallocated addresses, like FF02:0:0:0:0:0:0:2 targeting all routers on the LAN.
Anycast was also revamped in IPv6, as covered in the RFCs 4291 and 2526. Routers near the packet’s destination are required to be anycast-aware and route an anycast packet to the “nearest” interface (according to a particular measure, such as hops, latency, cost etc.).
DD-WRT implementation
Enough of theory, let’s go hands on!
Enable IPv6
The first thing we need to do is to enable IPv6 in the DD-WRT web interface. Configure the basic IPv4 setup as usual, make sure it’s working with your ISP, then go to Setup => IPv6.
In there, you’ll need to enable IPv6 and specify the type of IPv6 autoconfiguration your ISP uses. In my case, it’s DHCPv6 with Prefix Delegation (if you read the brief theory I wrote before, you know what this means ;) ), with a 64-bits prefix length. The rest I left as default, and disabled all the services, including the Router Advertisement Daemon (RADVD), because I’ll use DNSmasq for that.
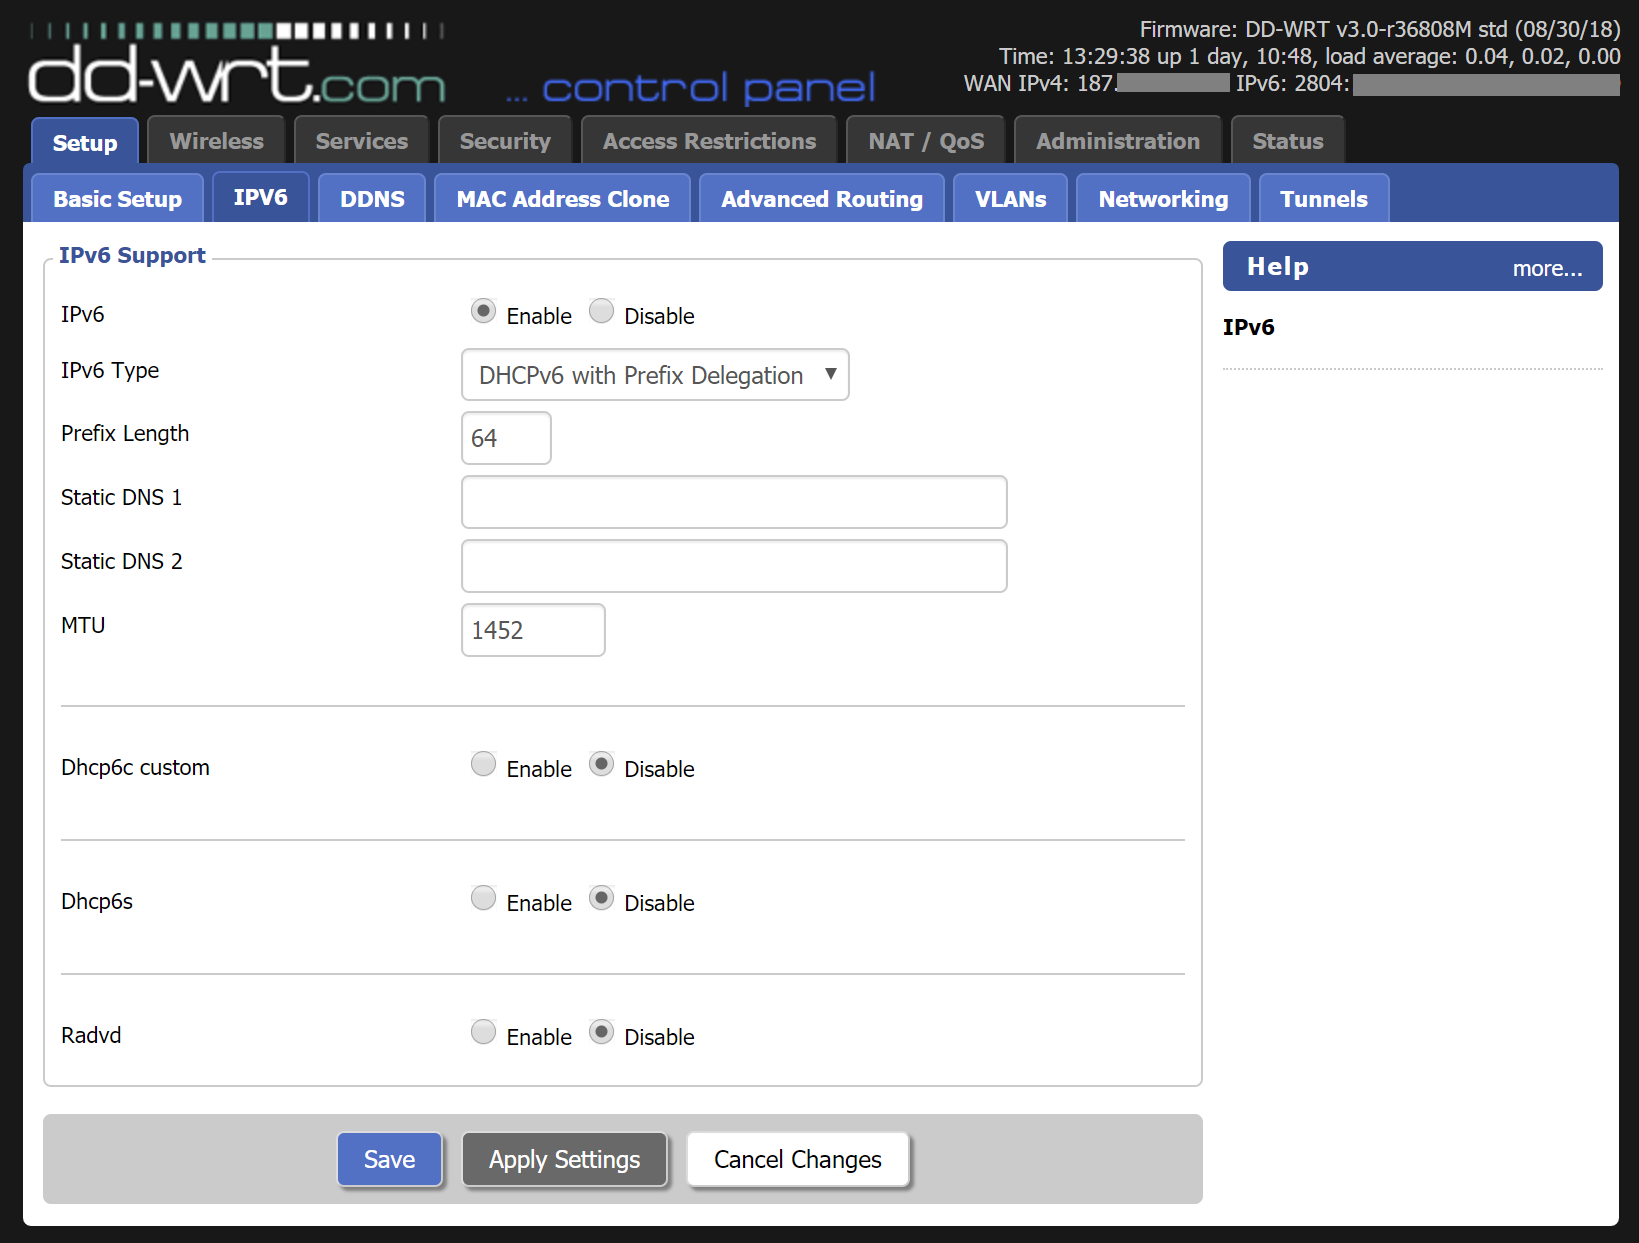
Click on Apply Settings, and you should see your router get a WAN IPv6 address from your ISP (at the top).
Configure DNSmasq
This is the real-deal, (UPDATE: it turns out that Wide-DHCPv6 client is also crucial, read below.) and it required a lot of reading and attempts to get it working the way I wanted. I’ll briefly describe what each configuration parameter does, but I suggest you read the DNSmasq manpage if you want a more in-depth understanding about them.
Basically, I’ll configure DNSmasq to assign the IPv6 prefix delegated from my ISP to its internal (LAN) interface (UPDATE: this is in fact handled by the Wide-DHCPv6 client, read below.), and start advertising it to the local network devices, using SLAAC with stateless DHCPv6. It will also give DNS names to dual-stack hosts, meaning it will nicely add A and AAAA records for each LAN device. Cool, right? IPv4 + IPv6 autoconfiguration with automatic DNS resolution!
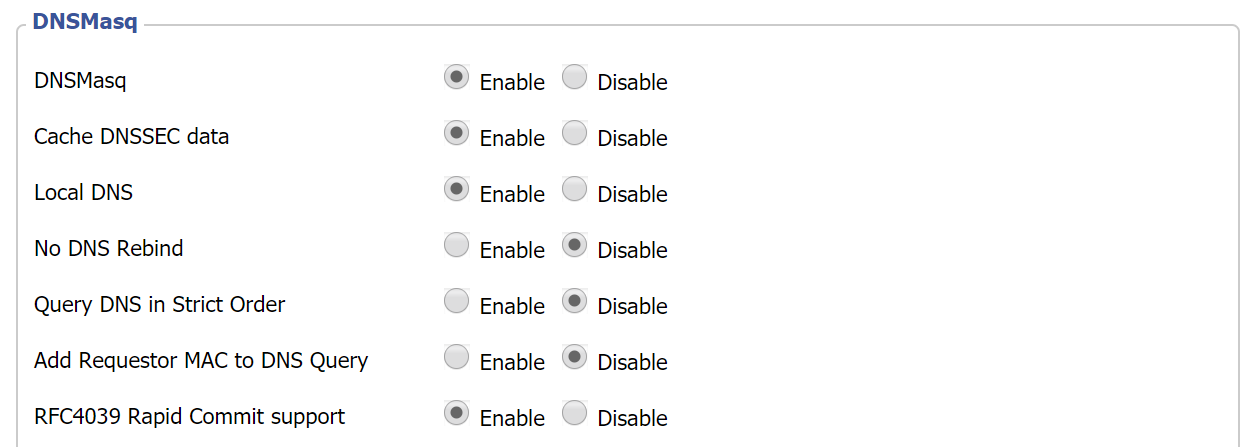
Go to Services => Services and scroll down to the DNSmasq section. The enable / disable options don’t require much explanation, so I’ll just paste a screenshot here:
What really matters are the Additional DNSmasq Options:
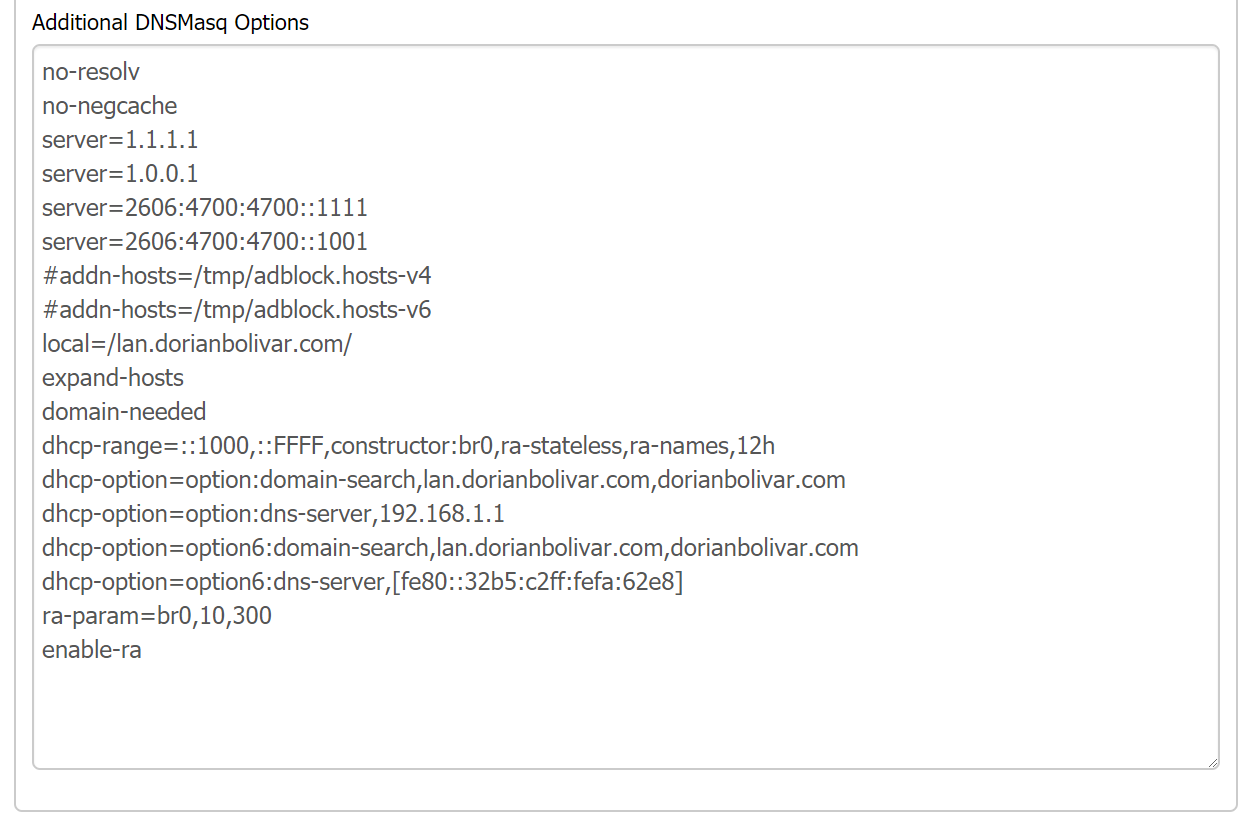
Let’s dissect one by one:
- no-resolv: don’t read /etc/resolv.conf, as I’ll specify the upstream DNS servers myself, right into this dnsmasq.conf.
- no-negcache: disable negative caching. I don’t like it, as it can mess with temporary failures in name resolution.
- server: the upstream DNS servers (since I enabled no-resolv). I’m using CloudFlare’s servers, and specified both their IPv4 and IPv6 addresses.
- addn-hosts: this is an attempt I made to block ads directly from DD-WRT, without external solutions (see my Pi-Hole article), but it didn’t work very well, so I commented it out.
- local: the DNS domain for LAN hosts, so DNSmasq knows when not to forward queries, and which suffix to attach to local host names.
- expand-hosts: add the DNS domain name to short hostnames (useful for local DNS resolution).
- domain-needed: do not forward A or AAAA queries for short (non-FQDN) hostnames to upstream servers (they don’t know anything about the LAN).
- dhcp-range: this is perhaps the most important part for this setup. It will use the assigned DHCP prefix as the constructor for LAN addresses, through SLAAC with stateless DHCPv6 for options only (ra-stateless), and give DNS names to dual-stack hosts (ra-names). The defined range (::1000 to ::FFFF) and lease time (12h) are ignored in this case, as it’s set for stateless addressing.
- dhcp-option / domain-search: publish a DNS domain search option through DHCP, for both IPv4 and IPv6.
- dhcp-option / dns-server: publish a DNS server through DHCP, for both IPv4 and IPv6. It shouldn’t be needed, but given some erratic behavior otherwise, I opted to add it (pointing to the router).
- ra-param: non-default values for router advertisements sent on the interface (br0). Just custom timing values.
- enable-ra: enable router advertisements (therefore, we don’t need RADVD, DNSmasq does it all).
Configure Wide-DHCPv6 client
(UPDATE: section added on Oct. 04, 2018.)
One crucial step of this setup is to automatically assign the IPv6 prefix given by the ISP to the router’s internal (LAN) interface. It will enable DNSmasq to identify the prefix and correctly advertise it to local hostnames, using SLAAC.
In DD-WRT, this job is accomplished by the Wide-DHCPv6 client. If you are setting up a conventional Linux box as a router, following this guide, I strongly recommend using it – there are other contestants, like Dibbler and even ISC DHCP, but in my experience Wide-DHCPv6 is the most straightforward solution available.
Ready to configure it? Well, sorry to frustrate you, but DD-WRT configures it automatically when you enable IPv6 with DHCPv6 Prefix Delegation. :) However, I think it’s useful to share the configuration it applies, because it can also be used for other scenarios (like a conventional Linux router box, just adapting the interface names):
| |
Use Link-Local (LL) addresses for local hosts
By default, DNSmasq was using the global address of each local host (remember, they all get an Internet-routable IPv6 address!) as the respective AAAA record, in its internal DNS (the ra-names option I mentioned before). Since my ISP uses a dynamic prefix delegation, it meant I wouldn’t have a consistent, fixed IP address for each of my local hosts and devices. Not that it really mattered much, as I could use just the hostname for almost everything, but I wanted to have everything consistent, to cover some edge cases. So, I opted to assign the Link-Local addresses to my hostnames, instead.
For IPv4, it can be accomplish by just configuring the Static Leases option, in Services. For IPv6, though, there’s no such option in the GUI. So, I created an /etc/hosts file with the static assignments, like this:
| |
It was a bit of a hassle in the beginning, as I needed to get all the LL addresses and populate the /etc/hosts file, but it was needed only once (now I just need to add or remove entries, as devices are added or removed from my LAN). But the result, coupled with the appropriate DNSmasq options, is a nice direct and reverse DNS resolution for all my hostnames, in both IPv4 and IPv6. :)
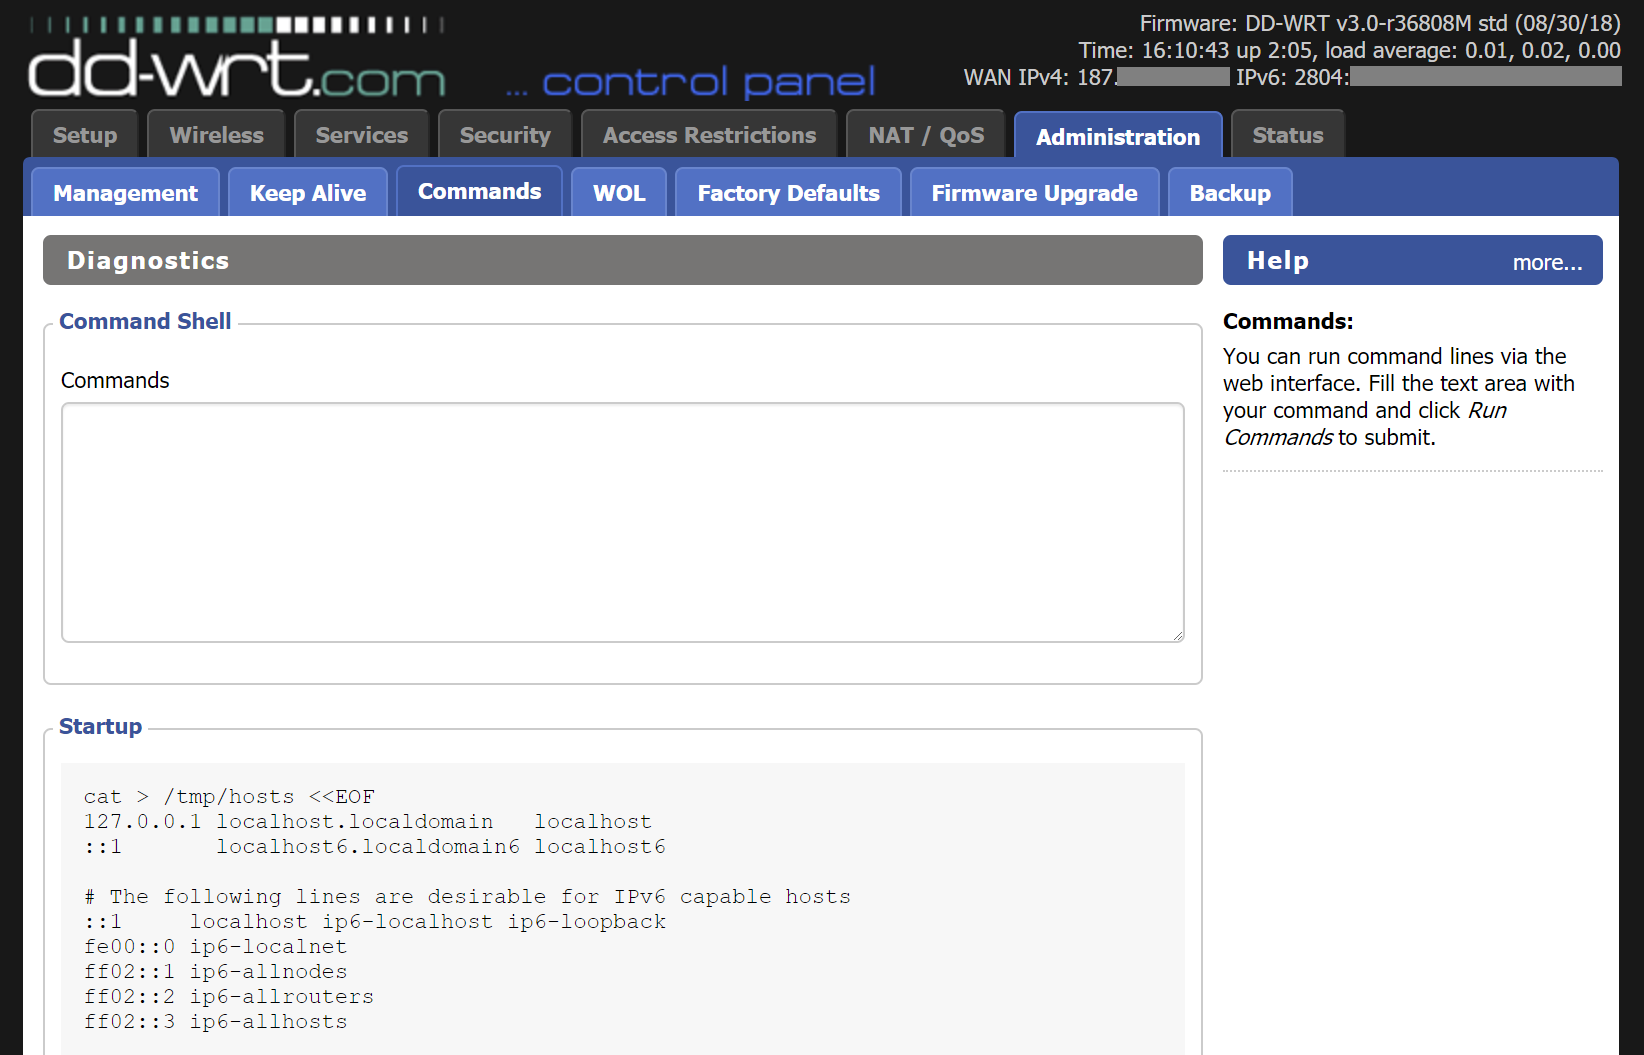
To make these changes survive a reboot, I created a startup script in Administration => Commands, in the following format (in DD-WRT, /etc/hosts is a symlink to /tmp/hosts):
| |
Finishing it up
To test if everything was configured appropriately, reboot your DD-WRT router to make sure the changes are persistent. Then, restart the network interface of your LAN devices (if needed), and watch if they get the statically-assigned IPv4 address, the autoconfigured Link-Local address, and the assigned Global Address (there can be more than one Global Address, if a host uses IPv6 Privacy Extensions).
You should then be able to ping each host on your LAN by name, using both IPv4 and IPv6:
| |
And each host should be able to reach the Internet using both IPv4 and IPv6:
| |
Conclusion
I hope you also found the IPv6 world fascinating and, if your ISP is (properly) IPv6-enabled, were able to configure it for effective use on your LAN (not necessarily with DD-WRT, as this setup works for Linux in general).
Not only this is the future of the Internet, but also enables a lot of cool things. NAT is gone; want to access some of your LAN devices from the Internet? Just configure your firewall to enable forwarding to it; done. Want to access your devices by name from the Internet, but your ISP gives you a dynamic prefix assignment, meaning you can’t setup static records in your domain? Just use an IPv6-enabled dynamic DNS (DDNS) provider.
And, as you read about IPv6, you’ll realize there’s much more to it.
References
- [1] Wikipedia - IPv6 <https://en.wikipedia.org/wiki/IPv6>
- [2] Wikipedia - DHCPv6 <https://en.wikipedia.org/wiki/DHCPv6>
- [3] Wikipedia - ICMPv6 <https://en.wikipedia.org/wiki/Internet_Control_Message_Protocol_for_IPv6>
- [4] Wikipedia - Link-Local Address <https://en.wikipedia.org/wiki/Link-local_address>
- [5] IETF - IPv6 Prefix Delegation models <https://tools.ietf.org/id/draft-templin-v6ops-pdhost-19.html>
- [6] IPv6 Friday - Multicast <http://ipv6friday.org/blog/2011/12/ipv6-multicast/>
- [7] DNSmasq man page <http://www.thekelleys.org.uk/dnsmasq/docs/dnsmasq-man.html>
- [8] DHCPv6 and RA with DNSmasq <https://weirdfellow.wordpress.com/2014/09/05/dhcpv6-and-ra-with-dnsmasq/>
- [9] TLDP - Linux IPv6 howto <http://www.tldp.org/HOWTO/Linux+IPv6-HOWTO/index.html>
- [10] Jan Taczanowski - Linux box as an IPv6 router with SLAAC and DHCPv6-PD <https://taczanowski.net/linux-box-as-an-ipv6-router-with-slaac-and-dhcpv6-pd/>
- [11] Debian Wiki - IPv6 Prefix Delegation <https://wiki.debian.org/IPv6PrefixDelegation>
- [12] Viva o Linux - Bruno Meirelles - IPv6 completo Net Virtua <https://www.vivaolinux.com.br/artigo/IPv6-completo-Net-Virtua?pagina=1>
- [13] Luiz Luca - Net Virtua e problemas com IPv6 (perda de rota padrão) <http://luizluca.blogspot.com/2016/05/netvirtua-e-problemas-com-ipv6-perda-de.html>
- [14] SysteMajik Consulting - Providing IPv6 DNS resolver data with radvd <https://www.systemajik.com/providing-ipv6-dns-resolver-data-using-radvd/>
